Forms
Each page in oTree can contain a form, which the player should fill out and submit by clicking the “Next” button. To create a form, first you need fields on the player model, for example:
class Player(BasePlayer):
    name = models.StringField(label="Your name:")
    age = models.IntegerField(label="Your age:")
Then, in your Page class, set form_model and form_fields:
class Page1(Page):
    form_model = 'player'
    form_fields = ['name', 'age'] # this means player.name, player.age
When the user submits the form, the submitted data is automatically saved to the corresponding fields on the player model.
Forms in templates
In your template, you can display the form with:
{{ formfields }}
Simple form field validation
min and max
To require an integer to be between 12 and 24:
offer = models.IntegerField(min=12, max=24)
If the max/min are not fixed, you should use {field_name}_max()
choices
If you want a field to be a dropdown menu with a list of choices,
set choices=:
level = models.IntegerField(
    choices=[1, 2, 3],
)
To use radio buttons instead of a dropdown menu,
you should set the widget to RadioSelect or RadioSelectHorizontal:
level = models.IntegerField(
    choices=[1, 2, 3],
    widget=widgets.RadioSelect
)
If the list of choices needs to be determined dynamically, use {field_name}_choices()
You can also set display names for each choice by making a list of [value, display] pairs:
level = models.IntegerField(
    choices=[
        [1, 'Low'],
        [2, 'Medium'],
        [3, 'High'],
    ]
)
If you do this, users will just see a menu with “Low”, “Medium”, “High”, but their responses will be recorded as 1, 2, or 3.
You can do this for BooleanField, StringField, etc.:
cooperated = models.BooleanField(
    choices=[
        [False, 'Defect'],
        [True, 'Cooperate'],
    ]
)
You can get the human-readable label corresponding to the user’s choice like this:
player.cooperated  # returns e.g. False
player.field_display('cooperated')  # returns e.g. 'Defect'
Note
field_display is new in oTree 5.4 (August 2021).
Optional fields
If a field is optional, you can use blank=True like this:
offer = models.IntegerField(blank=True)
Dynamic form field validation
The min, max, and choices described above are only
for fixed (constant) values.
If you want them to be determined dynamically (e.g. different from player to player), then you can instead define one of the below functions.
{field_name}_choices()
Like setting choices=,
this will set the choices for the form field
(e.g. the dropdown menu or radio buttons).
Example:
class Player(BasePlayer):
    fruit = models.StringField()


def fruit_choices(player):
    import random
    choices = ['apple', 'kiwi', 'mango']
    random.shuffle(choices)
    return choices
{field_name}_max()
The dynamic alternative to setting max= in the model field. For example:
class Player(BasePlayer):
    offer = models.CurrencyField()
    budget = models.CurrencyField()


def offer_max(player):
    return player.budget
{field_name}_min()
The dynamic alternative to setting min= on the model field.
{field_name}_error_message()
This is the most flexible method for validating a field.
class Player(BasePlayer):
    offer = models.CurrencyField()
    budget = models.CurrencyField()

def offer_error_message(player, value):
    print('value is', value)
    if value > player.budget:
        return 'Cannot offer more than your remaining budget'
Validating multiple fields together
Let’s say your form has 3 number fields whose values must sum to 100.
You can enforce this with the error_message function, which goes on the page:
class MyPage(Page):

    form_model = 'player'
    form_fields = ['int1', 'int2', 'int3']

    @staticmethod
    def error_message(player, values):
        print('values is', values)
        if values['int1'] + values['int2'] + values['int3'] != 100:
            return 'The numbers must add up to 100'
Notes:
If a field was left blank (and you set
blank=True), its value here will beNone.This function is only executed if there are no other errors in the form.
You can also return a dict that maps field names to error messages. This way, you don’t need to write many repetitive FIELD_error_message methods (see here).
Determining form fields dynamically
If you need the list of form fields to be dynamic, instead of
form_fields you can define a function get_form_fields:
@staticmethod
def get_form_fields(player):
    if player.num_bids == 3:
        return ['bid_1', 'bid_2', 'bid_3']
    else:
        return ['bid_1', 'bid_2']
Widgets
You can set a model field’s widget to RadioSelect or RadioSelectHorizontal if you want choices
to be displayed with radio buttons, instead of a dropdown menu.
{{ formfield }}
If you want to position the fields individually,
instead of {{ formfields }} you can use {{ formfield }}:
{{ formfield 'bid' }}
You can also put the label in directly in the template:
{{ formfield 'bid' label="How much do you want to contribute?" }}
The previous syntax of {% formfield player.bid %} is still supported.
Customizing a field’s appearance
{{ formfields }} and {{ formfield }} are easy to use because they automatically output
all necessary parts of a form field (the input, the label, and any error messages),
with Bootstrap styling.
However, if you want more control over the appearance and layout,
you can use manual field rendering. Instead of {{ formfield 'my_field' }},
do {{ form.my_field }}, to get just the input element.
Just remember to also include {{ formfield_errors 'my_field' }}.
Raw HTML widgets
If {{ formfields }} and manual field rendering
don’t give you the appearance you want,
you can write your own widget in raw HTML.
First, add an <input> element.
For example, if your form_fields includes my_field,
you can do <input name="my_field" type="checkbox" />
(some other common types are radio, text, number, and range).
Second, you should usually include {{ formfield_errors 'xyz' }},
so that if the participant submits an incorrect or missing value),
they can see the error message.
If you use raw HTML inputs, it’s recommended to also use Preserving unsubmitted inputs. Otherwise, if the user submits the form but it fails validation, they will have to restart the form from scratch.
Raw HTML example: custom user interface with JavaScript
Let’s say you don’t want users to fill out form fields, but instead interact with some sort of visual app, like a clicking on a chart or playing a graphical game. Or, you want to record extra data like how long they spent on part of the page, how many times they clicked, etc.
First, build your interface using HTML and JavaScript. Then use JavaScript to write the results into a hidden form field. For example:
# Player class
contribution = models.IntegerField()

# page
form_fields = ['contribution']

# HTML
<input type="hidden" name="contribution" id="contribution" />

# JavaScript
document.getElementById('contribution').value = 42;
When the page is submitted, the value of your hidden input will be recorded in oTree like any other form field.
If this isn’t working, open your browser’s JavaScript console,
see if there are any errors, and use console.log() (JavaScript’s equivalent of print())
to trace the execution of your code line by line.
Preserving unsubmitted inputs
Note
To use this, you must install oTree 6.0 (pip install otree --upgrade)
You can set the following attribute to preserve forms that were partially filled out before the page was reloaded:
class MyPage(Page):
    preserve_unsubmitted_inputs = True
This is useful in the following situations:
If your forms are using raw HTML inputs, and the user submits the form but it fails validation (without
preserve_unsubmitted_inputs = True, the user would have to restart the form from scratch)If the user fills out a form, but instead of clicking “next” clicks the “back” button, then later returns to this page.
If the user is filling out a form, then reloads the page, or closes the page and starts again later.
Note that these values are stored locally in the browser, not on the oTree server.
If you are writing the raw HTML of the inputs,
make sure they all have a name= attribute.
Buttons
Button that submits the form
If your page only contains 1 decision,
you could omit the {{ next_button }}
and instead have the user click on one of several buttons
to go to the next page.
For example, let’s say your Player model has offer_accepted = models.BooleanField(),
and rather than a radio button you’d like to present it as a button like this:
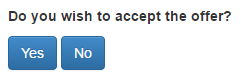
First, put offer_accepted in your Page’s form_fields as usual.
Then put this code in the template:
<p>Do you wish to accept the offer?</p>
<button name="offer_accepted" value="True">Yes</button>
<button name="offer_accepted" value="False">No</button>
You can use this technique for any type of field,
not just BooleanField.
Miscellaneous & advanced
Form fields with dynamic labels
If the label should contain a variable, you can construct the string in your page:
class Contribute(Page):
    form_model = 'player'
    form_fields = ['contribution']

    @staticmethod
    def vars_for_template(player):
        return dict(
            contribution_label='How much of your {} do you want to contribute?'.format(player.endowment)
        )
Then, in the template:
{{ formfield 'contribution' label=contribution_label }}
If you use this technique, you may also want to use Dynamic form field validation.
JavaScript access to form inputs
In your JavaScript code you can use forminputs.xyz to access the <input>
element of form field xyz. For example, you can do:
// get the value of an input
forminputs.xyz.value; // returns '42' or '' etc.

// set the value of a field.
forminputs.xyz.value = '42';

// dynamically set a field's properties -- readonly, size, step, pattern, etc.
forminputs.xyz.minlength = '10';

// do live calculations on inputs
function myFunction() {
    let sum = parseInt(forminputs.aaa.value) + parseInt(forminputs.bbb.value);
    alert(`Your total is ${sum}`);
}

// set an event handler (for oninput/onchange/etc)
forminputs.aaa.oninput = myFunction;

// call methods on an input
forminputs.xyz.focus();
forminputs.xyz.reportValidity();
Radio widgets work a bit differently:
my_radio = models.IntegerField(
    widget=widgets.RadioSelect,
    choices=[1, 2, 3]
)
// forminputs.my_radio is a RadioNodeList, not a single <input>
// so you need to loop over all 3 options:
for (let radio of forminputs.my_radio) {
    radio.required = false;
}

for (let radio of forminputs.my_radio) {
    radio.onclick = function() { alert("radio button changed"); };
}

// but the 'value' attribute works the same way as non-radio widgets
forminputs.my_radio.value = 2;