Rooms
oTree lets you configure “rooms”, which provide:
Links that you can assign to participants or lab computers, which stay constant across sessions
A “waiting room” that lets you see which participants are currently waiting to start a session.
Short links that are easy for participants to type, good for quick live demos.
Here is a screenshot:
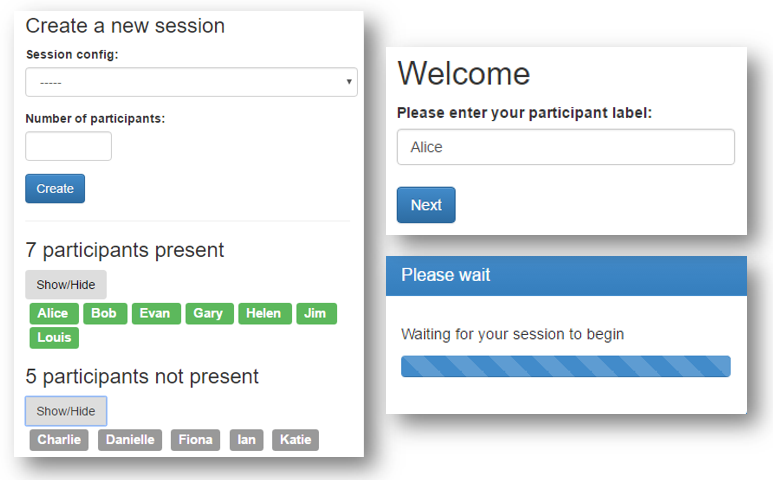
Creating rooms
You can create multiple rooms – say, for for different classes you teach, or different labs you manage.
If using oTree Studio
In the sidebar, go to “Settings” and then add a room at the bottom.
If using PyCharm
Go to your settings.py and set ROOMS.
For example:
ROOMS = [
    dict(
        name='econ101',
        display_name='Econ 101 class',
        participant_label_file='_rooms/econ101.txt',
        use_secure_urls=True
    ),
    dict(
        name='econ_lab',
        display_name='Experimental Economics Lab'
    ),
]
If you are using participant labels (see below),
you need a participant_label_file which is a relative (or absolute) path to a
text file with the participant labels.
Configuring a room
Participant labels
This is the “guest list” for the room. It should contain one participant label per line. For example:
LAB01
LAB02
LAB03
LAB04
LAB05
LAB06
LAB07
LAB08
LAB09
LAB10
If you don’t specify participant labels, then anyone can join as long as they know the room-wide URL. See If you don’t have a participant_label_file.
use_secure_urls (optional)
This setting provides extra security on top of the participant_label_file.
For example, without secure URLs, your start URLs would look something
like this:
http://localhost:8000/room/econ101/?participant_label=Student1
http://localhost:8000/room/econ101/?participant_label=Student2
If Student1 is mischievous,
he might change his URL’s participant_label from “Student1” to “Student2”,
so that he can impersonate Student2.
However, if you use use_secure_urls,
each URL gets a unique code like this:
http://localhost:8000/room/econ101/?participant_label=Student1&hash=29cd655f
http://localhost:8000/room/econ101/?participant_label=Student2&hash=46d9f31d
Then, Student1 can’t impersonate Student2 without the secret code.
Using rooms
In the admin interface, click “Rooms” in the header bar, and click the room you created. Scroll down to the section with the participant URLs.
If you have a participant_label_file
In the room’s admin page, monitor which participants are present, and when you are ready, create a session for the desired number of people.
You can either use the participant-specific URLs, or the room-wide URL.
The participant-specific URLs already contain the participant label. For example:
http://localhost:8000/room/econ101/?participant_label=Student2
The room-wide URL does not contain it:
http://localhost:8000/room/econ101/
So, if you use room-wide URLs, participants will be required to enter their participant label:
If you don’t have a participant_label_file
Just have each participant open the room-wide URL. Then, in the room’s admin page, check how many people are present, and create a session for the desired number of people.
Although this option is simple, it is less reliable than using participant labels, because someone could play twice by opening the URL in 2 different browsers.
Reusing for multiple sessions
Room URLs are designed to be reused across sessions. In a lab, you can set them as the browser’s home page (using either room-wide or participant-specific URLs).
In classroom experiments, you can give each student their URL that they can use through the semester.
What if not all participants show up?
If you’re doing a lab experiment and the number of participants is unpredictable, you can consider using the room-wide URL, and asking participants to manually enter their participant label. Participants are only counted as present after they enter their participant label.
Or, you can open the browsers to participant-specific URLs, but before creating the session, close the browsers on unattended computers.
Participants can join after the session has been created, as long as there are spots remaining.
Pre-assigning participants to labels
oTree assigns participants based on arrival time, e.g. the first person to arrive is participant 1. However, in some situations this may be undesirable, for example:
You want your participant labels to line up with the oTree IDs, in a fixed order, e.g. so that LAB29 will always be participant 29.
You want Alice/Bob/Charlie to always be participants 1/2/3, so that they get grouped to play together.
Just assign those participant labels in creating_session:
def creating_session(subsession):
    labels = ['alice', 'bob', 'charlie']
    for player, label in zip(subsession.get_players(), labels):
        player.participant.label = label
If someone opens a start link with participant_label=alice,
oTree checks if any participant in the session already has that label.
(This is necessary so that clicking a start link twice assigns back to the same participant.)
Passing data about a participant into oTree
Room welcome pages (consent forms, etc)
Note
To use this, you must install oTree 6.0
When you use a Room, oTree will show a Welcome page that asks the user to confirm to start.
This page is customizable. This means you can put a consent form or questionnaire or any other content.
Technical details
In settings.py, add welcome_page in your room definition:
ROOMS = [
    dict(
        name='my_room',
        display_name="My Room",
        welcome_page="_welcome_pages/RoomWelcomePage.html",
    ),
]
The welcome page is raw HTML. It doesn’t use oTree’s template system with {{ formfields }},
etc.
The job of your welcome page is
(1) to optionally validate the user (have them enter any info, check their response),
and (2) when they submit, send them to the room by adding welcome_page_ok=1 to the URL.
Consent form / quiz, etc.
You can add any form fields you want (dropdowns, checkboxes, etc.)
and check the user’s inputs using JavaScript and HTML attributes such as
required, min, max, etc.
When it’s validated, then add welcome_page_ok as above.
Custom welcome page + manual entry of participant label
If your app has a participant_label_file and you want users to enter their labels manually,
then you need to validate that it’s correct.
This can be done with an AJAX POST request to the page’s URL,
passing JSON like {"participant_label": "JohnSmith"}.
If the validation fails, the server will send back JSON like
{"errors": {"participant_label": "Invalid participant label"}}.
Display a message to your user and ask them to re-enter.
Once it succeeds, the server will return {"status": "ok"}.
in that case, you should append welcome_page_ok=1 to the URL and reload.